
Introduction
Cloning mushrooms, It always feels like the ultimate hack! You go out foraging find a specimen you love take a sample and regrow it at home. Alternatively, you could be growing out some spores and a HUGE mushroom is produced. Then you can clone it and grow out that genetic strain over and over with very similar results. When I found out you could do this I was amazed and it’s easier than you think if you know the right techniques.
Cloning mushrooms is pretty simple, in short terms you just have to take a tissue sample from the desired stain and place it onto a nutritious medium to expand into a usable spawn.
So, in this post, I’m going to discuss the different techniques you can use for cloning mushrooms at home from beginner to advanced.
Why Clone Mushrooms?
Advantages of Cloning Mushrooms
Proven genetics – When you clone a mushroom you will be getting the same genetic makeup as the original. As a result, you will be creating spawn that is proven to create viable fruits (until you hit senescence, discussed below).
Unlimited Spawn – In theory, if you use a master agar plate you can have unlimited spawn from cloning one mushroom.
Disadvantages of Cloning Mushrooms
Higher Risk of contamination – The mushrooms you are cloning from have been in a non-sterile environment for a while. As a result, care has to be taken to ensure a clean clone can be taken.
Senescence – If you continuously clone mushrooms then reclone the fruits again over and over eventually the mycelium will begin to lose it vigour. It will either become weak at defending against contamination, slow at colonization or stop producing fruit.
Why Clone Instead of Using Spores?
A multi spore syringe contains thousands of genetic variations within it, occasionally a strain may grow which does not produce viable fruits or has other undesirable traits. Mycologists and mushroom farmers cannot take these chances and prefer to grow out one proven strain time and time again to produce consistent results, this is why people use cloned tissue.
Can I Clone Store Bought Mushrooms?
Yes, it is possible to clone store-bought mushrooms or kitchen scraps, however, you will see better results from cloning mycelium from a spawn provider. This is due to the fact mushrooms in stores are often pushed to the point of senescence before reaching the shelves. As a result, the mycelium may only produce small fruits or none at all.
Don't be discouraged thought, I have cloned Oyster mushrooms cloned from the store, they did not create the biggest fruits I've seen but it was enough to collect some spores then start my own spawn off from them. If you are wondering how to clone store-bought mushrooms or kitchen scraps then at least one of the techniques below will suffice.
How to Clone Mushrooms
Guide 1 – Syringe transfer (beginner).
This method may work without a Still Air Box in theory. However, I am going to recommend using one anyway as this will increase the likelihood of success.
The technique is directed at beginners who may struggle with sterile technique as the agar is only exposed to open air through a small hole in the lid.
Requirements:
- Agar Plates (see Guide 1 here for instructions on how to prepare for this technique).
- Mushroom stem.
- Inoculation Syringe.
- Still Air Box (this method may work without a SAB but I would use one anyway).
- BBQ Lighter.
- Hob.
- Saucepan.
- Alcohol wipes.
- Micropore tape.
Instructions:
Preface – As discussed earlier you must first prepare the agar plates inline with Guide 1 in this article I have written.
Ensure there is a hole in the top of your lid which can fit an inoculation syringe.
Also, if you don't have a “still air box” which I recommend, follow this simple tutorial to create one which I’ve created here. I normally use my small flow hood for agar work, see it here.
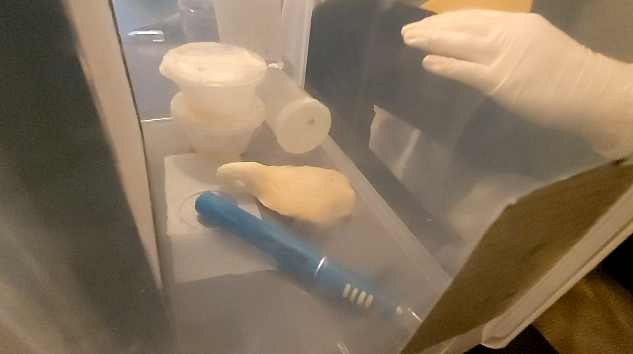
Step 1 – Preparation.
Spray down the Still Air Box with soapy water. Place the agar plates, mushroom stem, BBQ lighter and alcohol wipes inside your Still Air Box, making sure to wipe each down first with alcohol. Put the lid on the “Still Air Box” and allow it to settle minutes.
Finally, heat a saucepan of water until it reaches a rolling boil.
Step 2 – Sterilize.
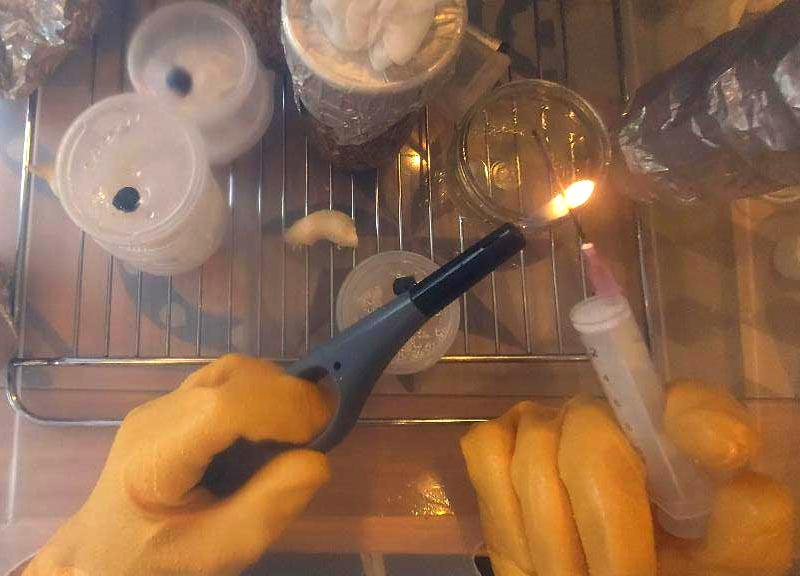
Take the inoculation syringe (with the needle on) and draw up then eject water from the boiling saucepan to sterilize the inside of the syringe.
Next, draw up water to the first tick on the barrel of the syringe. Wipe the outside of the syringe with an alcohol wipe and place it inside the “still air box”.
Put on some rubber gloves then wipe them down with an alcohol wipe then place hands inside of the “still air box”.
Wipe down the outside of the mushroom stem with an alcohol wipe and place to the side.
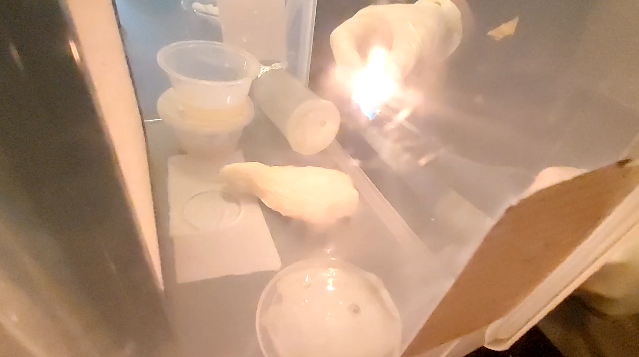
Flame sterilize the needle of the inoculation syringe until it is glowing red.
Step 3 – Transfer Sample
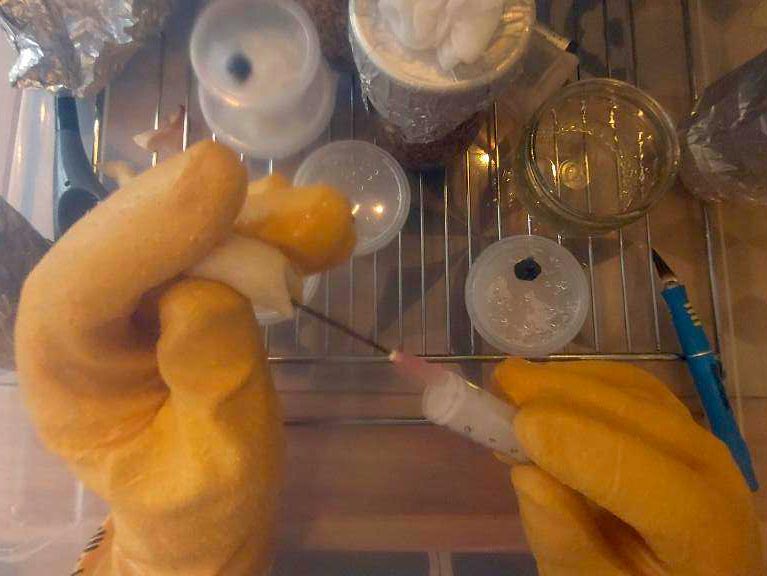
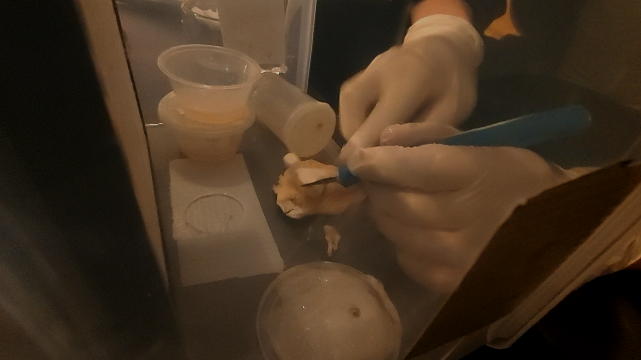
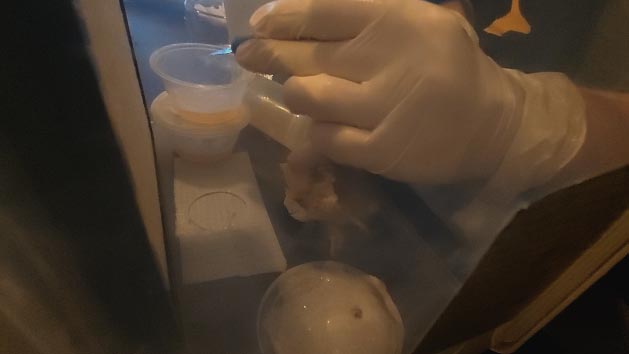
Take the mushroom stem and tear off the bottom and the top of the stem to reveal the sterile middle. Pass the syringe needle through the centre of the mushroom stem and using a scooping motion, tear off some of the mushroom (there should be tissue inside the needle hole when complete).
Next, push the inoculation syringe through the hole in the lid of the agar plate (through the micropore tape) and push down on the plunger.
This should result in a small amount of sterilized water and mushroom tissue landing on the agar.
Finally, replace the micropore over the whole and place the plate into incubation conditions.

Guide 2 – Cardboard and Stems (beginner).
This method will only work with certain strains of mushroom which are capable of regrowing from stems, usually oyster mushrooms. This guide follows very little sterile technique which means it will be very hit and miss, however it can work.
Requirements:
- Cardboard (corrugated preferably).
- Oyster Mushroom stems.
- Container and Lid.
- Disinfectant Spray.
- Alcohol Wipes.
Instructions:
Step 1 – Preparation.
Spray the general work area with disinfectant spray. Next, wipe the mushroom stems and container/lid with alcohol wipes to help clean the surfaces.
Run the piece of cardboard you have collected under a tap of water until they are soaked to field capacity (only drip a few drops of water release when squeezed).
Step 2 – Stack Tissue samples.
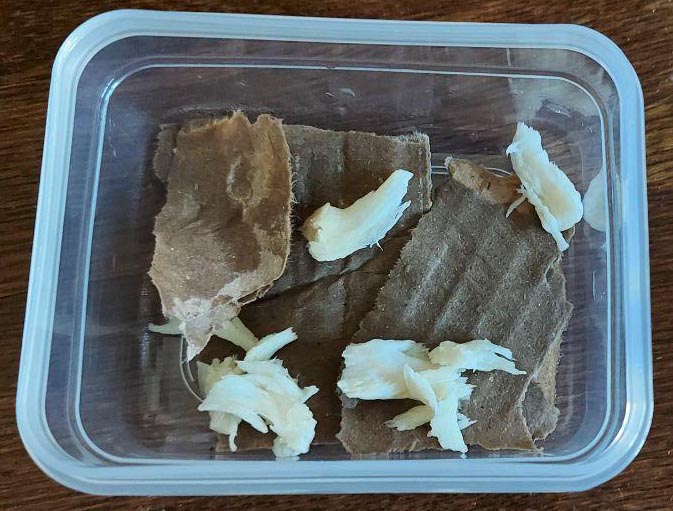
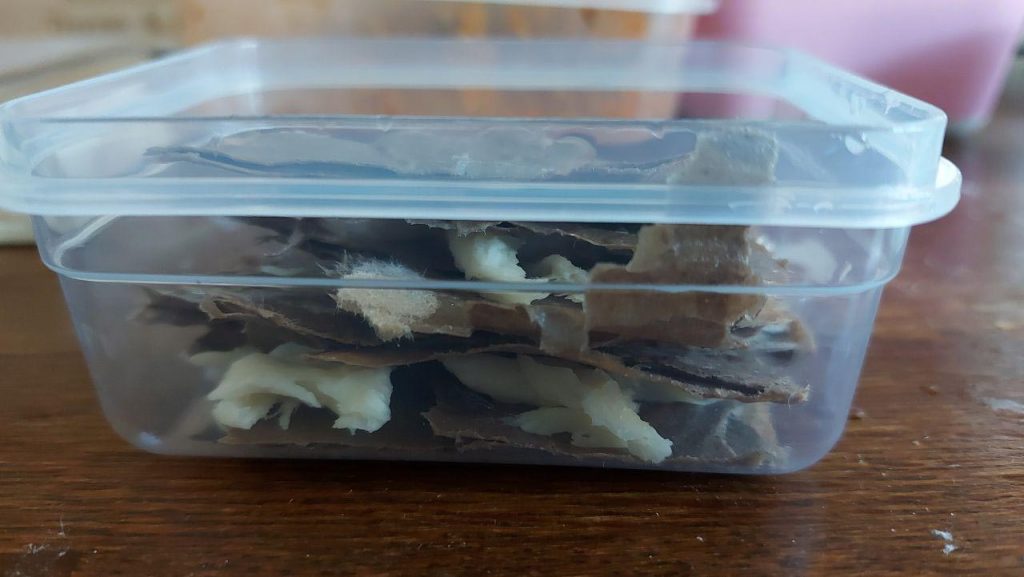
Tear the mushroom stem into pieces and stack the pieces in layers with the cardboard inside the container. Try to ensure there is no pooling water inside the container afterwards.
Step 3 – Wait.
Place the containers in a warm location and wait. Within 14days you should be able to see if the mushroom stems have grown out and colonized the cardboard. This technique is a bit hit due to the lack of sterile technique but it has a low barrier to entry!
When complete, you will see the cardboard covered in white mycelium, ready to spawn into a bulk substrate such as straw.
Guide 3 – Scalpel Method (advanced).
Although there are fewer steps inside this guide, there is an increased risk of contamination due to the fact you have to open up the agar to the still air box environment. I like to use my portable laminar flow hood (how to build one here) for doing my clones.
Requirements:
- Agar Plates.
- Mushroom stem.
- Still Air Box.
- BBQ Lighter.
- Scalpel
- Alcohol wipes.
Instructions:
Preface – Before starting this guide you must first have agar plates which have been created and sterilized. If you don't know how to create agar plates please follow one of the guides I have created here.
Also, this will require a “Still Air Box” which you can make using this tutorial by me here. In this guide I am using my small flow hood, see how to make one here.
Step 1 – Preparation.
Spray down the Still Air Box with soapy water. Place the agar plates, mushroom stem, BBQ lighter, scalpel and alcohol wipes inside your Still Air Box, making sure to wipe each down first with alcohol. Put the lid on the “Still Air Box” and allow it to settle 10 minutes.
Step 2 – Sterilize.
Put on rubber gloves and then wipe down the surface of the gloves with alcohol wipes. Then place hands inside the “still air box”.
Flame sterilize the scalpel inside the “still air box” until the end is glowing red then wait a few seconds for it to cool down so you don't kill the tissue inside the mushroom stem.
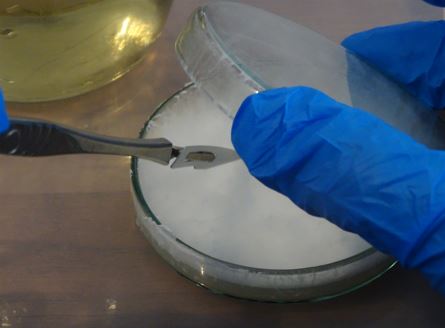
Step 3 – Transfer Sample.
Wipe down the outside of the mushroom stem one last time (don't let it get soaked), then tear it in half. The inside of the mushroom stem is considered sterile as it hasn't been subjected to the airborne environment yet.
Take the scalpel and remove a tissue sample from the centre of the stem, near the top or bottom of the stem.
Place the tissue sample onto the nutritious agar, only removing the lid from the plate momentarily.
Repeat for all your plates then place them into incubation conditions.

Wait 5-14 days for results.
Conclusion
Using one of these three guides you should now know how to clone mushrooms to create unlimited spawn and clone genetics. In my opinion the final guide is the one everyone should strive to achieve. Once you can clone and perform agar work in this manner it opens a world of opportunity for your grows. The next step is to make grain spawn from the colonized agar and begin the mushroom farming cycle.

2 thoughts on “How to Clone Mushrooms.”
Wonderful article! We will be linking to this particularly great article on our website. Keep up the great writing. Sallyanne Israel Hedelman
I got into growing in Sept. 2022 and watched 100’s of videos, bought kits, struggled with contam. losing about half of my grows. Today I found your remarkably easy instructions and I wish I had found this before going through all of that. I just want to say THANKS!. I know I’ll do better now.