How To Make A Spore Syringe.
For those diving into the world of mushroom cultivation, mastering the art of creating a spore syringe is crucial.
This guide breaks down the step-by-step process to create your own spore syringe at home using just sterilized tap water.
This spore syringe offers a practical method for storing and distributing spores, however it's essential to distinguish it from a liquid culture syringe (if you still don't know the difference checkout liquid culture vs spore syringe).
For mycology enthusiasts, it's not only a foundational skill but an engaging DIY project.
Let's dive in!
Requirements.
Before we delve into the process, let's first gather all the necessary materials.
These items are generally easy to source. I have used amazon affiliate links below. If you purchase anything using my links I will get a small commision, however most of the items will likely be cheaper to obtain from a supermarket.
The mushroom cap can be picked up from the store or a wild sample which you have found.
To make a spore syringe , you'll need:
- Glass jars with lids (use small jars for small caps and large jars for larger caps).
- Aluminum foil.
- Elastic bands.
- A pressure cooker (read about the best pressure cookers).
- A still air box.
- A mature mushroom cap (Preferably one with a cap which has an open veil)
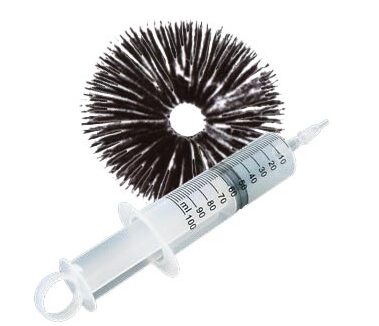
- A sterile syringe with a needle.
- Butane torch (seriously get one of these they work perfectly).
- Tap water
The mushroom can be any species you're interested in cultivating and the syringe can be a used liquid culture syringe you have lying around as I will show you how to sterilize it.
Step-by-step guide
Step 1 – Preparing the Water
Begin by pouring tap water into your jars until they're approximately 1 quarter full. Then, secure the lid on each jar and cover the top with a piece of aluminum foil, fastening it with an elastic band. This foil will serve as an extra barrier against potential contaminants when we remove the jar from the pressure cooker.
Note: There needs to be either a hole on the lid of the jar or the jar lid should be slightly loose to allow the pressure in the jar to stabilise during sterilisation.
Step 2 – Sterilising the Water
Place your prepared jars in a pressure cooker and sterilize at 12-15 psi for around 30 minutes. This step ensures that any competing contaminants in the water are eradicated, creating a sterile environment for the spores to drop.
If you don't know how to use a pressure cooker yet check out how to use a pressure cooker.
Step 3 – Preparing a Still Air Box
Once the sterilization cycle is completed, while the pressure cooker cools down, prepare your still air box. This could be as simple as a large clear plastic container with two holes cut into it for your hands or you can purchase a proper one on amazon.
The aim is to create an environment where the air is still and external contaminants are minimized from dropping into your sterile water.
Step 4 – Placing Jars in the Still Air Box
Once your jars have cooled to room temperature, transfer them into the still air box. It's crucial to ensure they have cooled down; otherwise, the heat might kill the spores.
Step 5 – Spore Collection
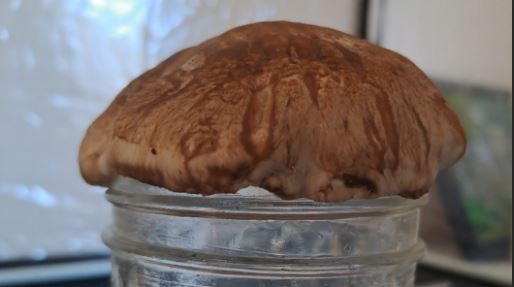
Carefully remove the lid from one of your jars and place a mature mushroom cap over the rim of the jar.
The cap should be gill-side down to allow the spores to fall into the jar.
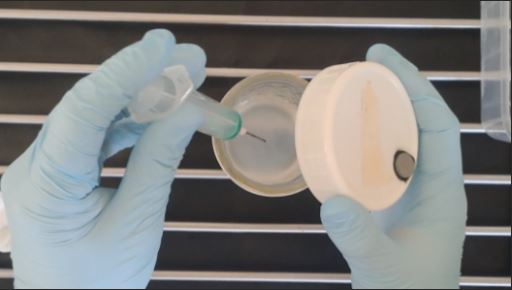
If you have smaller mushrooms then use a smaller jar like he honey pot shown below.
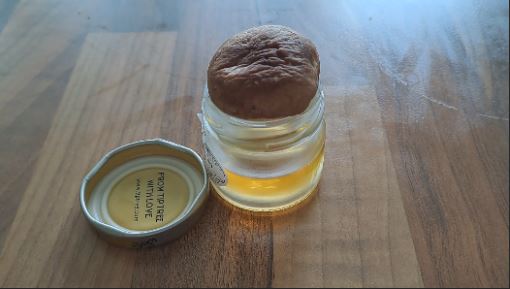
Step 6 – Waiting Period
Now comes the patience-testing part – waiting. Allow the cap to rest on the rim for 12 to 24 hours inside your still air box.
This period allows enough time for the spores to drop from the cap and into the water in your jar.

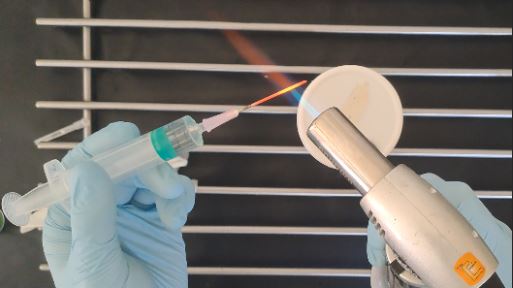
Step 7 – Sterilizing A Syringe.
Boil some water in a pot and repeatedly flush the syringe with the boiling water. I like to flush around 4-5 times with boiling water, so draw it up then eject it over and over.
Draw up a small amount of water into the syringe then allow it to cool, we will use this to cool the needle after flame sterilization.

Step 8 – Making A Spore Syringe.
Flame sterilize the needle tip, remove the mushroom from the rim then eject the small amount of water into the spore jar (to cool down the needle tip).
Once you've allowed enough time for spore collection, take your sterile syringe into your still air box.
Finally, use the sterile syringe to suck up the spore-filled water, creating your spore syringe.
What liquid is in spore syringes?
Distilled water or sterilized tap water is fine for spore syringes, it doesn't matter too much.
For long term storage it is better to use distilled water as it does not contain minerals which could cause the spore to germinate but again this is unlikely.
Conclusion
And there you have it – a straightforward guide to making a spore syringe at home. While it might seem like a meticulous process, it's a rewarding one, providing you with a tool that's essential in mushroom cultivation.
Plus, it's a fascinating way to witness the life cycle of these remarkable organisms. Remember to work as cleanly as possible throughout the entire process to reduce the risk of contamination. Happy mushroom cultivation!


2 thoughts on “How To Make A Spore Syringe.”
Where did you get the Still Box?
We have them available on our shop, https://ezmushroom.com/shop/mycology-equipment/still-air-box-mycology-mushroom-cultivation/